1. What It Does
The aht25-web-monitor project turns an ESP32 into a networked weather station. An AHT25 temperature and humidity sensor sits on the I2C bus, and the ESP32 reads it every 2 seconds and serves the data two ways:
- Web dashboard at
/— a dark-themed, auto-refreshing page showing temperature in °F (primary) and °C, humidity as a percentage, the current time synced via NTP, and the sensor status. - JSON API at
/json— a machine-readable endpoint returning temperature, humidity, time, and sensor status, ready to be consumed by another ESP32, a phone app, or a home automation system.
Why AHT25
The AHT25 is a calibrated I2C sensor with ±2% RH and ±0.3°C accuracy. It's cheap (~$2), tiny, and reads over the same 2-wire bus as hundreds of other sensors — no ADC, no signal conditioning.
Why a JSON API
A second ESP32 can poll /json over WiFi and use the readings to trigger fans, displays, or alerts — no cloud service needed, no API keys, no rate limits.
src/credentials.h file that's excluded from version control.2. How It Works
Four components pass the data along a simple chain:
The data flow
The ESP32 uses the Wire library to talk to the AHT25 over I2C at address 0x38. Every 2 seconds, loop() calls aht.read(tempC, humidity) which returns Celsius and relative humidity. The web handler converts to °F and builds the HTML. The JSON handler builds a simple JSON string with all values. NTP syncs the clock in the background so the dashboard always shows the correct time.
3. Parts You Need
The parts list is tiny — just the board, the sensor, and three jumper wires:
| Item | Why | Notes |
|---|---|---|
| ESP32 DevKit V1 (38-pin) | Runs the firmware; has WiFi + I2C | Any ESP32-WROOM-32 board with GPIO21 & GPIO22 broken out |
| AHT25 breakout board | Temperature + humidity sensor | 3.3V–5V I2C, address 0x38 |
| 3x female-to-female jumper wires | Connects sensor to the ESP32 | SDA, SCL, VCC, GND (4 wires total) |
| USB cable (data, not charge-only) | Power + serial debug | micro-USB or USB-C depending on your board |
pio device monitor shows nothing, try a different cable.4. Hardware & Wiring
The ESP32 DevKit V1
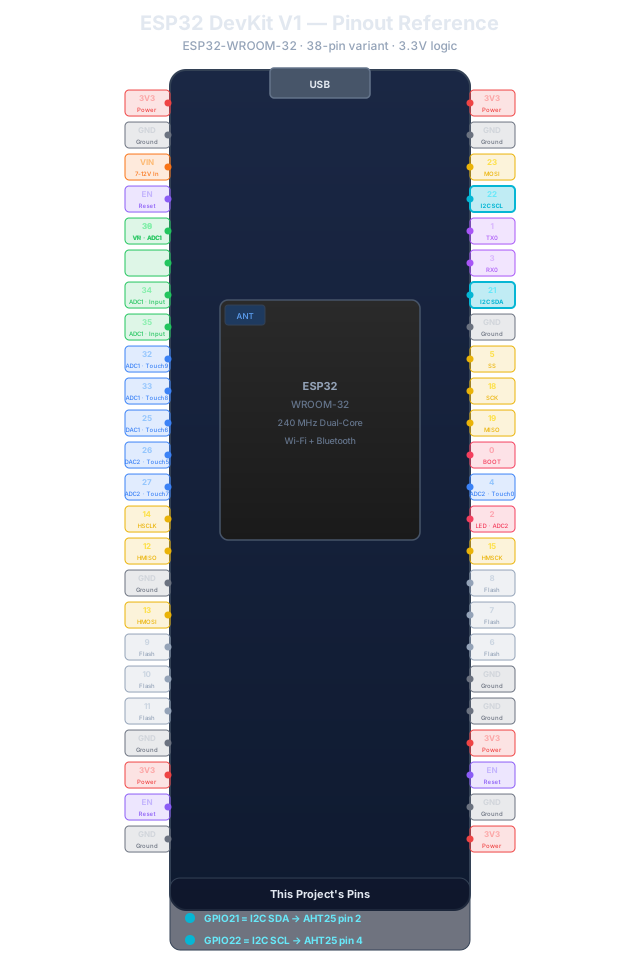
ESP32 DevKit V1 pinout (38-pin variant). The pins highlighted in cyan are the I2C pins used by this project: GPIO21 (SDA) and GPIO22 (SCL).
The AHT25 sensor
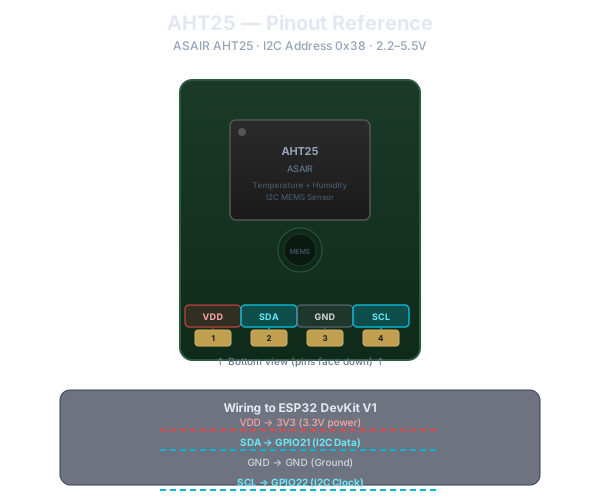
AHT25 sensor pinout (bottom view). Four pins: VDD (power), SDA (data), GND (ground), SCL (clock). The sensing hole on top is where air enters for the MEMS element.
Wiring
Connect the AHT25 to the ESP32 with four jumper wires:
| AHT25 Pin | → | ESP32 Pin | GPIO |
|---|---|---|---|
| VDD | → | 3V3 | 3.3V power |
| SDA | → | GPIO21 | I2C data |
| GND | → | GND | Ground |
| SCL | → | GPIO22 | I2C clock |
5. Toolchain Setup
Install VS Code
Download and install Visual Studio Code for your OS.
Install the PlatformIO extension
In VS Code, open Extensions (Ctrl+Shift+X), search for PlatformIO IDE, and install it. PlatformIO handles the entire ESP32 toolchain — compiler, libraries, flashing — so you don't need Arduino IDE or ESP-IDF separately.
Clone the repo
git clone https://github.com/charlesscrimpshire/aht25.git
cd aht25Open in PlatformIO
In VS Code: File → Open Folder, pick the aht25 folder. PlatformIO auto-detects the platformio.ini and loads the project.
6. Project Structure
Four files, one of which is gitignored:
aht25/
├── platformio.ini          ← build config (board, framework, libraries)
├── .gitignore              ← excludes credentials.h and build artifacts
└── src/
    ├── aht25.h             ← AHT25 sensor driver wrapper class
    ├── main.cpp            ← WiFi, NTP, web server, JSON API, sensor reads
    └── credentials.h       ← YOUR WiFi creds (gitignored, never committed)
7. platformio.ini Explained
[env:esp32dev]
platform = espressif32
board = esp32dev
framework = arduino
monitor_speed = 115200
lib_deps =
adafruit/Adafruit AHTX0@^2.0.3 ; AHT20/AHT25 sensor library| Setting | What it does |
|---|---|
board = esp32dev | Targets the generic ESP32-WROOM-32 DevKit |
framework = arduino | Uses the Arduino framework (simple APIs) |
monitor_speed = 115200 | Baud rate for the serial debug console |
Adafruit AHTX0 | Library that handles the AHT25 I2C protocol |
8. Credentials (Secure)
WiFi credentials are stored in a separate file that's gitignored and never committed to GitHub:
Create src/credentials.h
Create the file src/credentials.h with your WiFi details:
#pragma once
#define WIFI_SSID "YourNetworkName"
#define WIFI_PASS "YourPassword".gitignore. Never hardcode credentials in main.cpp — always keep them in this separate, untracked file.9. Code Walkthrough
9.1 The AHT25 wrapper (aht25.h)
class AHT25 {
public:
    bool begin(uint8_t addr = 0x38, int sda = 21, int scl = 22) {
        Wire.begin(sda, scl);
        Wire.setClock(100000);
        return _sensor.begin(&Wire);
    }
    bool read(float &tempC, float &humidity) {
        sensors_event_t humidityEvent, tempEvent;
        _sensor.getEvent(&humidityEvent, &tempEvent);
        if (isnan(tempEvent.temperature) || isnan(humidityEvent.relative_humidity))
            return false;
        tempC = tempEvent.temperature;
        humidity = humidityEvent.relative_humidity;
        return true;
    }
};
A tiny wrapper around the Adafruit AHTX0 library. begin() initializes I2C on the specified pins and starts the sensor. read() returns false if the sensor fails to respond.
9.2 WiFi + NTP (in setup)
WiFi.begin(WIFI_SSID, WIFI_PASS);
while (WiFi.status() != WL_CONNECTED) delay(500);

configTime(GMT_OFFSET, DST_OFFSET, NTP_SERVER);  // pool.ntp.org
The board connects to WiFi, then configures NTP in the background. The clock offset is set for CST (UTC-6) with +1h daylight saving. NTP keeps the time accurate without any RTC hardware.
9.3 The web dashboard
void handleRoot() {
    String tempF = String(temperature * 9.0f / 5.0f + 32.0f, 1);
    // ... builds HTML with tempF, humidity, getTimeStr() ...
    server.send(200, "text/html; charset=utf-8", html);
}
The dashboard HTML is built as a raw string literal, injected with live values. It uses a <meta http-equiv="refresh" content="5"> tag to auto-reload every 5 seconds. The charset=utf-8 Content-Type ensures the ° symbol renders correctly.
9.4 The JSON API
String buildJSON() {
    String json = "{";
    json += "\"time\":\"" + String(timeBuf) + "\",";
    json += "\"temperature_c\":" + String(tempBuf) + ",";
    json += "\"temperature_f\":" + String(temperature * 9.0f / 5.0f + 32.0f, 1) + ",";
    json += "\"humidity\":" + String(humBuf) + ",";
    json += "\"sensor_ok\":" + String(sensorOK ? "true" : "false");
    json += "}";
    return json;
}
No JSON library needed — just string concatenation. The API returns all values in a single object, making it easy to parse on another ESP32 with ArduinoJson or even raw string parsing.
9.5 The loop
void loop() {
    server.handleClient();   // handle web requests
    readSensor();            // read AHT25 every 2 seconds
}
Non-blocking by design. readSensor() only runs every READ_INTERVAL (2000 ms), so the web server stays responsive between reads.
10. Build & Flash
Plug in the board
Connect your ESP32 with a data USB cable. On Linux, check the port:
ls /dev/ttyUSB* # typical CH340 serial portBuild and flash
pio run -t uploadPlatformIO auto-detects the serial port. If it picks the wrong one, set it in platformio.ini:
upload_port = /dev/ttyUSB0Watch the serial monitor
pio device monitorYou should see:
=== AHT25 Web Monitor ===
AHT25: OK
Connecting to YourNetwork...
WiFi: 192.168.0.102
NTP: 2026-08-19 23:09:42 CDT
Web server: starteddialout group: sudo usermod -a -G dialout $USER, then log out and back in.11. Using It
Open the dashboard
Visit http://<ESP32-IP>/ in any browser. The page auto-refreshes every 5 seconds and shows:
- Temperature in °F (large) and °C (small)
- Humidity as a percentage
- Time synced via NTP
- Sensor status — OK or ERROR
Query the JSON API
curl http://192.168.0.102/jsonReturns:
{
  "time": "2026-08-19T23:09:42",
  "temperature_c": 27.3,
  "temperature_f": 81.1,
  "humidity": 54.2,
  "sensor_ok": true
}Use from another ESP32
Another ESP32 can fetch the JSON over WiFi and parse it with ArduinoJson:
HTTPClient http;
http.begin("http://192.168.0.102/json");
int code = http.GET();
String payload = http.getString();
// parse JSON with ArduinoJson...
12. Troubleshooting
| Symptom | Likely cause | Fix |
|---|---|---|
| AHT25: FAILED | Wiring wrong, or sensor not on I2C | Check SDA→GPIO21, SCL→GPIO22; run an I2C scanner sketch |
| WiFi: FAILED | Wrong SSID/password, or out of range | Verify credentials.h; move closer to the router |
| NTP: sync timeout | DNS or internet issue | Check WiFi connection; try a different NTP server |
| Dashboard shows ° symbol as garbage | Missing charset in Content-Type | Ensure text/html; charset=utf-8 in server.send() |
| JSON returns 0.0 for everything | Sensor reads NaN (not connected) | Check wiring, verify I2C address is 0x38 |
| Serial monitor shows nothing | Wrong baud rate or charge-only cable | Set monitor to 115200; try a data cable |
13. Next Steps & Ideas
- Data logging — write readings to SPIFFS or an SD card with timestamps for historical charts.
- MQTT — push readings to a Home Assistant / Mosquitto broker for home automation.
- OTA updates — add ArduinoOTA so you can flash new firmware over WiFi without plugging in USB.
- Multiple sensors — chain AHT25, BME280, or BMP280 on the same I2C bus and show all readings.
- Alerts — send an email or push notification when temperature crosses a threshold.
- Deep sleep — wake every 5 minutes, read, report, and sleep to run on battery for months.